


The goal of this tutorial is to help you create a Text Blaze snippet that will automatically retrieve title and word count data from a Google Sheet. This will allow you to create a snippet with a form. This form will have a dropdown menu of your titles. Selecting a title will auto-populate the title and word count in your snippet. This is very useful for the repeated task of writing cover letters or filling out submission forms where this info is required.
This uses features that are only available to Pro users of Text Blaze. If you are not already a Text Blaze user, you can sign up here. You will also need to install the Text Blaze Chrome extension.
Create a Google Sheet
First, you’ll need to create a Google Sheet that contains your story titles in one column and word counts in another column. If you already have a Google Sheet that contains this data, you can use that. Here’s a screenshot of my sheet. It’s one I previously created, so it has a bunch of extra irrelevant data in it. All you really need is the first two columns.

Publish the Sheet as a tab-separated values (TSV) file
Next, you need to publish the sheet with your title and word count data as a TSV file. I’m using tab-separated (tsv) instead of comma-separated (csv) because some of my stories have commas in the titles, and that breaks the script.
Note that anyone who has the url to your sheet will be able to view this data, so don’t put anything in the sheet that you wouldn’t want a stranger to know. If you don’t want a stranger to know your titles and word counts, then you should stop here.
Open your Google Sheet and go to File > Share > Publish to Web.

That will display a pop up like this:

In the first dropdown, select the tab in your sheet that has the title and word count data (“Data Sources” in the screenshot above). In the second dropdown, select “Tab-separated values (.tsv).” Make sure you check the box for “Automatically republish when changes are made.” Then click Publish. This will take you to a new window with the url of your published sheet.
You’ll need this url, so copy it to your clipboard.
Create a snippet to load the tsv
Log into Text Blaze and create a new snippet. Name it something like “Load from Google Sheet” and give it a shortcut like “/load.” Inside the snippet, paste this:
{urlload: INSERT GOOGLE SHEET URL HERE; done=(res) -> ["tsv": res]}{rows=sort(slice(map(split(tsv, "\n"), row -> split(row, "\t")), 2),(a,b)->comparestrings(a,b)); trim=right}
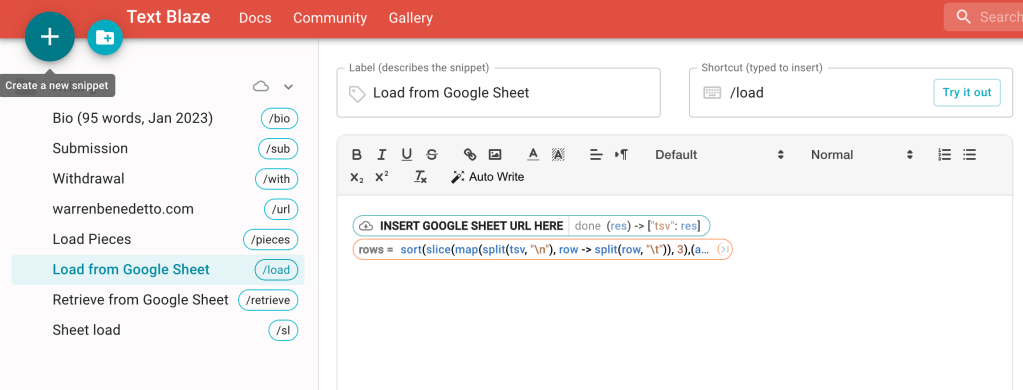
Replace “INSERT GOOGLE SHEET URL HERE” in the snippet with the url of the published TSV from the previous step. This snippet assumes your sheet has a single header row, and that your data starts in row 2. If you don’t have a header, change the “2” in the snippet to a “1” instead.
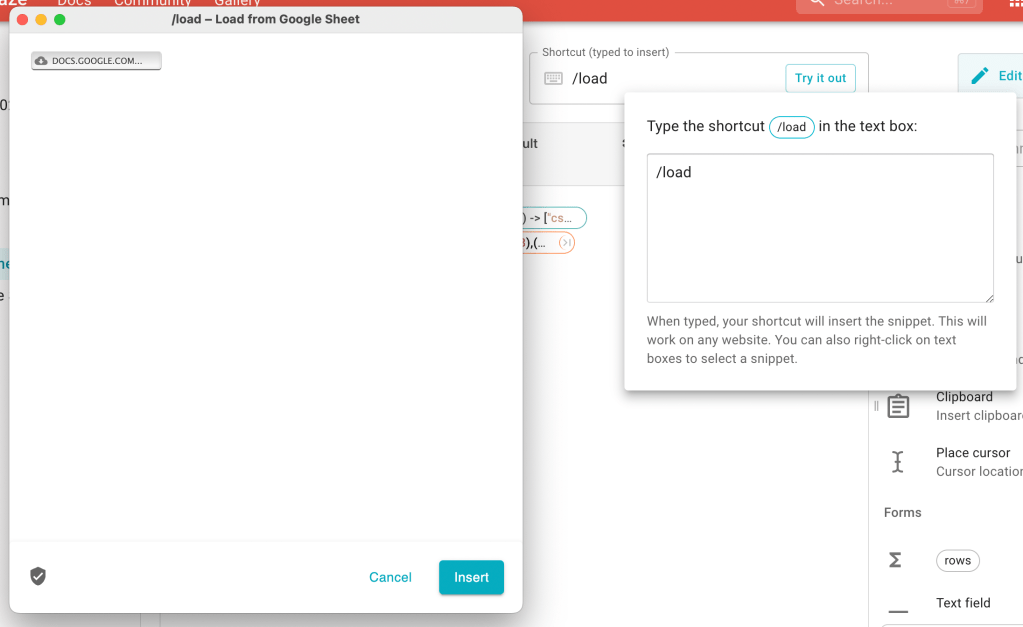
To try it out, click the Try It Out button and type your shortcut (e.g. /load). That will open a popup window with a small chiclet that says DOCS.GOOGLE.COM. At first, there will be a red warning symbol. Once the file loads, it will disappear. That’s how you know it is working. You can then close the popup.
Create a snippet to use the loaded data
Create another new snippet in Text Blaze. Name it something like “Retrieve from Google Sheet” with a shortcut like “/retrieve.” Inside the snippet, paste this code:
TITLE:  {formmenu: values={=rows}; itemformatter=(row) -> row[1]; name=col}
WORDS: {=col[2]}

{import: /load}
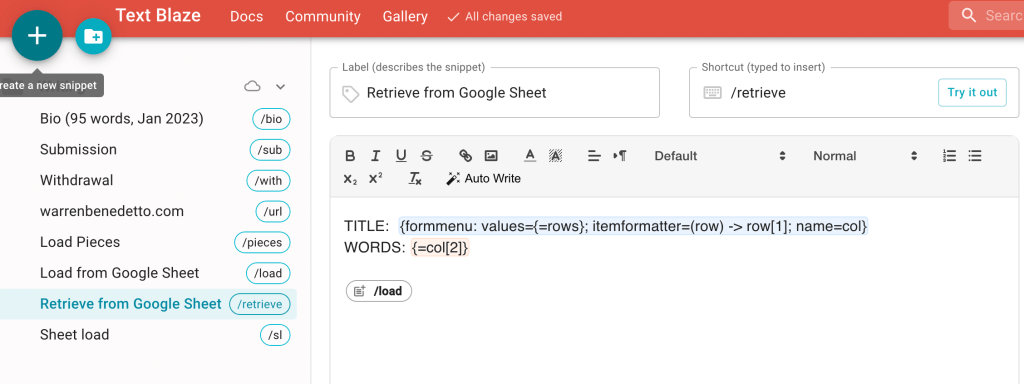
The first line will display the word “TITLE” with a dropdown containing your story titles. Note the row[1] in the snippet. That tells the snippet that your titles are in the first column of your sheet. If your titles are in a different column, change the 1 to the correct column number.
The second line will display the word “WORDS” with your word count auto-populated. Note the col[2] in the snippet. That tells the snippet that your word count is in the second column of your sheet. If your word counts are in a different column, change the 2 to the correct column number.
The final line is what tells the snippet to import the data from the previous snippet you just created. The “/load” needs to match the shortcut you created in the previous step.
To try it out, click the Try It Out button and type your shortcut (e.g. /retrieve). This will open a popup window that looks like this:

It looks like an error, but it’s not! Click the dropdown menu, and you should see your list of titles.

Select a title from the list, and it should auto-populate the word count.

Click the Insert button in the popup, and it will insert the title and word count into the Try It Out box.

Now what?
Now that you’ve got everything wired up, you can create new snippets that use the imported data by right-clicking the “Retrieve from Google Sheet” snippet and selecting Duplicate Snippet.

You can then amend that snippet to be whatever you want. Just don’t change anything inside the braces {}, and make sure you don’t lose the {import: /load}.
For example, this is my cover letter snippet:
Please consider this submission of "{formmenu: values={=rows}; itemformatter=(row) -> upper(row[1]); name=col}" ({=col[2]} words).

{import: /load}
Once I select a title from the form, it looks like this:
Please consider this submission of "A Whisper and a Scream" (100 words).
What else?
Although this tutorial is only focused on a very simple use-case of inserting title and word count, you can insert any data that is in your sheet. For example, imagine you had a sheet like this, with info about when a story was published:

You could pull several columns from this just by referencing them with col[x]. For example, I could include information about my submission being a reprint:
Please consider this submission of "{formmenu: values={=rows}; itemformatter=(row) -> row[1]; name=col}." It was originally published in "{=col[5]}" by {=col[4]} on {=col[8]}. All rights are currently available.

{import: /load}
Selecting a title gives me this:
Please consider this submission of "In the Water." It was originally published in "Ancients" by Black Hare Press on 2020-08-31. All rights are currently available.
Conclusion
Hopefully this tutorial helps you automate your submission process and reduces the amount of tedious copy-and-pasting you need to do. Good luck!
